Pages

Wednesday, September 29, 2010

Under $100 Linky Party

So mamny fun and creative links showing up--thanks for participating!  I am having a tough time decide what to feature, so I am hoping you don't mind if I show off a few more links than normal.
Adorable felted acorns from The Speckled Dog--easy too!
Chrissie's Creations shared trash to treasure at its finest:
Meet Virginia made this pendant light from thrift store raffia!
This little nature snowflake stamp from Red Ted Art's blog would be great for my preschoolers:
The Hand Me Down House made these simple lovely no sew curtains:
                               
Adventures in Creating lightens up beautifully!
                                  
Envirocraftiness shows how to preserve fall leaves--I am doing this today!
                           
Home Hinges prettied up a little table for the porch.
                 Black table with flowers
How to make skeleton leaves from The Other White House --fantastic tute!

                                            
This Fresh Fossil shared a fresh take on a fall wreath.


 Looking forward to more fantastic fall link ups as well as other thrifty ideas this week!
Under $100 Linky Guidelines
1. Please link to the specific post, not your blog!
2. Please only post ideas that cost $100 or less--it would be great if you share the cost of your project, but not necessary.
3. Please include a brief description in link up.
4. Grab my Under $100 button on the sidebar and include it in your post or a link to Beyond the Picket Fence so people can find you and more great ideas.
5. Please check and make sure your link works. If it doesn't you can delete it and try again :)
6. Please no direct links to sales sites, i.e. ETSY or just a plain ol' commercial site, we are looking for inexpensive ideas we can recreate, thanks!


Wednesday, September 22, 2010

Project 4 and Under $100 Linky Party

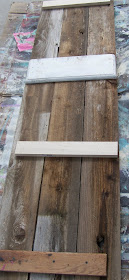
Well, I have completed my mini challenge--4 projects in 5 days and yes, I used more old fencing.  I decided to make a simple table bench.  I started by making a basic rectangle from old 2 x 4's (also from the fencing)--I determined the size I needed after cutting the fence boards I was using for the top. 
I then decided I need 1 more piece in the middle for support.
I forgot anymore in process pictures, but I added some 2 x 4 legs and used a dark oak wax on the base.  I painted the top with the same colors and wash I have been using.  A few people asked what colors I used.  Sorry, most of them are mixed from oops/free paints. After the top pieces were painted I screwed them to the base.  Simple, but sturdy and I love the rustic look of it.

Puppy had to get in this picture:


I am linking up to sweet Gail at My Repurposed Life!
Now here are some great links from last week! 
That Looks Like Craft shares this adorable bird art:
 
Brambleberry Cottage struts her junk with this great project!

 
Love this bathroom redo from Hi Sugarplum!

Impatiently Praying For Patience did an amazing job on this trash to treasure project.

 
Under $100 Linky Guidelines:
1. Please link to the specific post, not your blog!
2. Please only post ideas that cost $100 or less--it would be great if you share the cost of your project, but not necessary.
3. Please include a brief description in link up.
4. Grab my Under $100 button on the sidebar and include it in your post or a link to Beyond the Picket Fence so people can find you and more great ideas.
5. Please check and make sure your link works. If it doesn't you can delete it and try again :)
6. Please no direct links to sales sites, i.e. ETSY or just a plain ol' commercial site, we are looking for inexpensive ideas we can recreate, thanks!


Tuesday, September 21, 2010

Project 3 of My 4 in 5 Challenge

When I started out on this little challenge for myself  I did not plan on using all old fence boards for the projects. Honestly, I had no plan at all, which was not the smartest of ideas.  I have decided that maybe in the future BEFORE I challenge myself to make x number of projects in x amount of days I should have a general idea of what projects I want to make.  But, thankfully the old fence boards have been inspiring me (I have no idea if they will show up in project #4 or not).
Today's project started much the same as the last two:  I cut the fence boards to the size I wanted and connected them together with some scrap pieces screwed to the back.  I cut a thin piece of scrap plywood into a rectangle and painted it with chalkboard paint. I then dug through my junk, oops I mean very special treasures, to find the right pieces to use for the board.  At first I was going to use all old kitchen things, a potato masher, a pastry blender, flour sifter, etc. I decided I wanted something a little more industrial looking against the rough wood.  This is what I came up with:
The metal basket hangs on two metal chair leg protector thingy bobbers.
I used the washers to add a touch of metal to the chalkboard.  The metal vase is a thermos liner.
Not sure what the hooks on the bottom were from and I love them, but I have a confession--they are not hooky enough to hold much so I will take them off tomorrow and see if I can gently bend them some or modify them somehow.
Come back tomorrow to see what project 4 will be (it is a mystery to me too!) and to link up your great ideas to my Under $100 Linky Party.
Find more ideas at It's So Very Cheri and Today's Creative Blog and Funky Junk Interiors.

Monday, September 20, 2010

Just Hangin' Out--Project 2 of My 4 in 5 Day Challenge

Project 2 in my self induced 4 projects in 5 days challenge started much the same as project 1.  This project was inspired by some old wooden hangers I had.  I used 3 old fence boards and screwed them together with scrap wood on the back.  I had to figure out where I wanted the hangers so that I could put the boards in the right place.
reclaimed wood towel rack http://bec4-beyondthepicketfence.blogspot.com/2010/09/just-hangin-out-project-2-of-my-4-in-5.html

reclaimed wood towel rack http://bec4-beyondthepicketfence.blogspot.com/2010/09/just-hangin-out-project-2-of-my-4-in-5.html
I then washed some color on the wood, after a quick sanding.
reclaimed wood towel rack http://bec4-beyondthepicketfence.blogspot.com/2010/09/just-hangin-out-project-2-of-my-4-in-5.html
I had originally planned on using drawer knobs but spied the spools while digging for the right knobs and decided on them instead.  First I drilled a hole all the way from the front through the back in the exact spot I wanted the spool centered,  This gave me a mark on the back to drill next to so I would hit the spools in the right place. I hot glued the spools to the front just to hold them in place.  I then drilled from the back next to the "mark" hole on either side and put two long screws into each spool so they would be good and secure.
Now came the fun part, thinking of all of the uses for this simple project!
Magazine holder,


Great for towels,
reclaimed wood towel rack http://bec4-beyondthepicketfence.blogspot.com/2010/09/just-hangin-out-project-2-of-my-4-in-5.html

reclaimed wood towel rack http://bec4-beyondthepicketfence.blogspot.com/2010/09/just-hangin-out-project-2-of-my-4-in-5.html
Or how about in the kitchen?
reclaimed wood towel rack http://bec4-beyondthepicketfence.blogspot.com/2010/09/just-hangin-out-project-2-of-my-4-in-5.html


reclaimed wood towel rack http://bec4-beyondthepicketfence.blogspot.com/2010/09/just-hangin-out-project-2-of-my-4-in-5.html

It would be great for a beautiful collection of necklaces, in a sewing room for fabric, in a mud room for scarves and mittens, and...What ideas do you have?
Find more great ideas at All Thingz Related and at Between Naps on the Porch  and Funky Junk Interiors.

Saturday, September 18, 2010

4 in 5--Bullseye

Here is my first 4 projects in 5 days post.  I needed some more free art for my living room "ledge area" and wanted something simple and fun.  I started with three fence boards that I cut the dog-ear ends off of and connected on the back.
I then lightly sanded them and painted them a cream color.
I found the center and then the side centers (really, does that make any sense?).
I used an old tupperware lid to trace a circle around--this one is nice because I could see through it so I could see the center dots I had made.
I then got out the 5 or 6 colors I wanted to use, a couple different sized brushes and some water.  I started by tracing around or inside the circle. I used water to keep the edges soft.  I had no plan, just painted bullseyes.
 
When I was satisfied (and out of room because the circles were touching) I sanded it a little and propped it up on my ledge.   Now one of these days soon, really it will be soon, I am going to paint the wall in that nook, ledge area, blue I think, but until then I am happy with my free art.

Find more fun ideas at Funky Junk Interiors!

Wednesday, September 15, 2010

Under $100 Linky Party!

Once again it has been a whole week since I posted.  Not acceptable!  So I have decided starting Saturday I am going to challenge myself to show 4 new things in 5 days (need a 1 day cushion in there).  Here are some great links from those of you who were not slackers last week!  Oh and if anyone can tell me how to change the font size or style on inlinkz?  I see a thing that says style but I can never click on it.  Thanks!!

Between U and Me shared some great placemat pillows.  Funny thing is, I bought the same placemat for the same purpose.
Beyond the Screen Door inspired me to start to paint my bar stools (haven't finished).
Here is a quick and easy recipe from Fun On a Dime for mmm, kettle corn!
Life in Rehab shared these spooktacular ghost lanterns:
Check out this great October window from On Hollyhock Farm.  So many other possibilities with this fun idea!
Looking forward to this week's links--thanks for sharing with us.  And don't forget to check in Saturday for the start of my 4 in 5!

Under $100 Linky Guidelines:
1.  Please link to the specific post, not your blog!
2.  Please only post ideas that cost $100 or less--it would be great if you share the cost of your project, but not necessary.
3.  Please include a brief description in link up.
4.  Grab my Under $100 button on the sidebar and include it in your post or a link to Beyond the Picket Fence so people can find you and more great ideas.
5.  Please check and make sure your link works.  If it doesn't you can delete it and try again :)
6.  Please no direct links to sales sites, i.e. ETSY or just a plain ol' commercial site, we are looking for inexpensive ideas we can recreate, thanks!


Wednesday, September 8, 2010

Under $100 Linky Party!

Busy, busy week.  We were out of town over the long weekend and jumped back in feet first to my new preschool year--no crafting or junking for me :(.  Luckily lots of great links to keep my creative juices flowing.  Here are a few from last week's linky party:
Impatiently Praying For Patience showed off her great cabinet redo:

Get more bang for your buck with this 2 sided decor idea from That Looks Like Craft:

Paisley Passions has one of the most fun dining room table around!

Love some easy and beautiful paper projects like Pittypat Paperie shared:

And finally Nice Girl's Notes dollhouse is nothing short of amazing--really!  Check her link out to see how she made this:


Under $100 Linky Guidelines:
1.  Please link to the specific post, not your blog!
2.  Please only post ideas that cost $100 or less--it would be great if you share the cost of your project, but not necessary.
3.  Please include a brief description in link up.
4.  Grab my Under $100 button on the sidebar and include it in your post or a link to Beyond the Picket Fence so people can ind you and more great ideas.
5.  Please check and make sure your link works.  If it doesn't you can delete it and try again :)
6.  Please no direct links to sales sites, i.e. ETSY or just a plain ol' commercial site, we are looking for inexpensive ideas we can recreate, thanks!