If you are new here, welcome to day one of my annual 12 Days of Christmas posts--where I share 12 hopefully fresh and new to you ideas WITH tutorials. This event is like its own mini book.
A few things you should know if you are new here: the posts will NOT be for the next 12 consecutive days, but my plan is to be done with them by Thanksgiving, the ideas are all fairly easy and INEXPENSIVE things to make for your home, and I do not sing the 12 days of Christmas song for you (In the past I did write really bad poems for it, but I will save you all from that.).
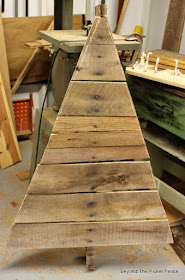
This year in celebration of my book, Crafting with Wood Pallets (BUY HERE), I have decided to make many of the projects from pallets, like this simple tree.
I have made other wood tress, but I have never made them like this and I haven't seen them made this way (although I am sure there are some out there, I didn't look). This was easier and much faster than any other wood trees I have made and I like it better--win, win!!
I started with a "solid" pallet--one that didn't have spaces between the pallet boards. You can use one that has spaces, it will just look a little different.
I used a yardstick and chalk to draw two angled lines.
Using a jigsaw, I cut off the bottom front board. I cut it away from the middle board first and then just broke it off from the side boards.
Still using the jigsaw, I cut the tree out. I then flipped it over and cut through the 2 back support boards to "release" the tree from the pallet.
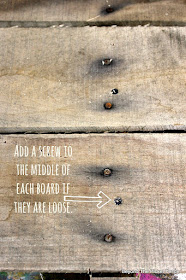
My boards were a little loose so I added one screw through the middle of each board.
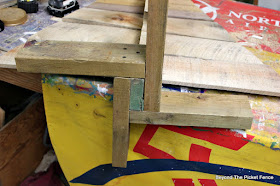
To make the base, you need to remove the board pieces that are left on the stem. I used a hammer to remove the nails and board.
Cut four 2"x4" boards 12 inches long. Using 2 1/2" screws, attach two of the boards to the pallet stem going in opposite directions.
Add the other two the other way for a sturdy base that won't tip over.
Now comes the fun part--personalizing and making it UNIQUE. I left mine rustic and plain and simply added a rusty star from the craft store.
But you can paint it--white, green, all different colors. You can add lights from the back and let them poke through the board spaces. Pound some small nails all over the front to hang ornaments. Paint words to a favorite carol on the tree. Make a whole forest of trees different sizes and have fun!


Becky - CUTE, CUTE, CUTE! Love this little tree.
ReplyDeleteJudy
Thanks Judy! It is so quick to make!!
Deleteawesome becky love it xx
ReplyDeleteLove it!! Great idea!!
ReplyDeleteHugs,
Deb
Becky,
ReplyDeleteyour pallet Christmas tree is so cute! I love how it turned out and I have scheduled a bunch of pins!
gail
I was just helping my husband clean out his shed and told him to leave the pallets for trees. I was going to do exactly this leave them on the board and cut a triangle, seemed simple, I hadn't got farther then the idea so I'll just follow your directions. Thanks, look forward to more.
ReplyDelete