Wednesday, April 30, 2014

Under $100 Link Party

Spring is definitely springing in my neck of the woods...finally.  Okay, I won't mention the five inches of snow we woke up to, today the sun is shining and I am in shorts and sandals :).  It is the little things sometimes that make me smile. We are praying for those wo ave had too much weather this week, all in te path of the tornadoes and the flooding! 

Your wonderful links make me smile too like these:
Sweet bench from D.D.'s Cottage


Tuesday, April 29, 2014

Etsy Shop Open

After an almost year long break (way too long!), I have opened my etsy shop again HERE:  Come see the goodies!

Saturday, April 26, 2014

Reclaimed Wood Sofa Table Tutorial

I was having a bad day yesterday.  I was frustrated, tired of being sick with a head cold, irritated with a few people.  I decided to take my frustrations to the garage and this sofa table was the result.
make a sofa table from reclaimed wood scraps
I started with a piece of plywood. 
use plywood for a base for scrap wood table
 I fit a few larger pieces of reclaimed oak and barnwood on the top.  I didn't want it too piecey--so I kept the pieces large and used just five of them.  I wasn't sure if I was going to paint them or stain them so I left them as is to start.  I used screws from the bottom to secure the wood pieces.  
use scrap wood pieces to make an easy sofa table
I decided paint was the way to go, so I painted the wood pieces.  I knew I was going to sand a lot off, but I still painted them completely, just what I like to do.
paint scrap wood pieces to make a table top
I then added oak edges or sides.  I secured these from the underside 
and with a screw at each corner.
secure table sides or apron from the underside and corners
Next came the legs, securing these with screws screwed in from the outside, through the edging.  I am not a fine furniture maker--I do rustic.  I never worry too much about the screws showing, it is how I roll, take it or leave it.
table legs are secured tot he table apron with screws
A brace between the legs helps square and sturdy up the legs.
use a brace between table legs to secure the table
Two more reclaimed oak boards make a great bottom shelf.
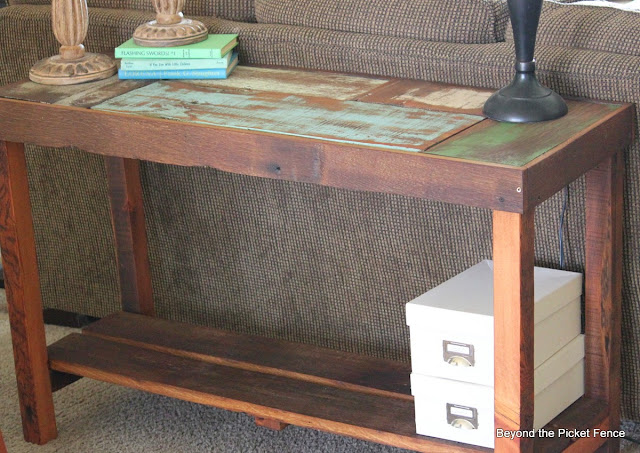
add a bottom shelf to a reclaimed wood sofa table
After a good sanding, I applied a mixture of coconut oil and Annie Slaon dark wax.
use coconut oil and wax to finish the wood on a table
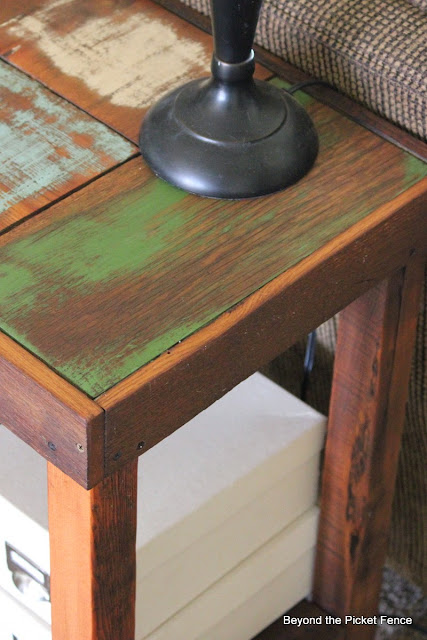
I love how the patchwork top came out and the bottom shelf adds extra storage!
reclaimed wood sofa table made from scraps
A good, productive way to work out a little stress.
use salvaged wood to make a table
Linking up at Funky Junk Interiors.

Friday, April 25, 2014

Girlfriend's Weekend DIY Inspiration

Welcome to Weekend DIY Inspiration, Girlfriend's DIY week 4! Here you get four fabulous DIY projects from my Upcycling friends, and plenty of inspiration for the weekend. Check out what we have in store for you this week!


 Can you believe how clever these faux Deer Antlers are? Tami from Curb Alert is amazingly creative. You won't believe what they looked like when she started! 
Faux Deer Antlers

Wednesday, April 23, 2014

Under $100 Link Party

Sorry, a few minutes behind here.  I almost forgot--we had Monday off and now I am a day late and a dollar short.  So, on to some lovely links from last week:
A great crate from A Piece of Rainbow


Monday, April 21, 2014

Earth Day, A Junker's Version

We junkers, repurposers, salvagers--we are Earth Day in action, year round.  We take discarded items, things deemed useless by others and recreate them, make them pretty and useful again.  Earth day is OUR holiday and we should celebrate!  
earth day projects reduse reuse recycle http://bec4-beyondthepicketfence.blogspot.com/2014/04/earth-day-junkers-version.html
Here are few past projects made with materials that otherwise would have ended up most likely in a landfill:

Friday, April 18, 2014

Weekend DIY Inspiration

girlfriends-diy-collage
Welcome to Weekend DIY Inspiration, Girlfriend's DIY week 3! Here you get four fabulous DIY projects from my Upcycling friends, and plenty of inspiration for the weekend.

Wednesday, April 16, 2014

Under $100 Link Party

I can't believe it Easter this week.  I remember thinking Easter was so far away...sigh.  My oldest is about 21--21!!  How did that happen? My youngest is beginning to think she is miss independent.  Time keeps on ticking, whether we savor it or not.  Savor is going to my mantra, at least for the next week or two, until sadly I forget and life gets too fast and crazy again.  

How do you savor you time, days?  Take a few minutes to savor some great projects from last week:
Simply lovely sign from Lake Girl Paints

Tuesday, April 15, 2014

Paint Tutorial 2

Thanks everyone for your participation in our Junker's United link party and giveaways!  It is still going on, so if you haven't entered to win or checked out all the great links--do so now!!  (See previous post!)

So I, along with many of you, received a message this week from Pinterest saying that one of my pins had been removed for copyright infringement.  What this means is that someone reported one of MY pictures, with MY watermark, leading to MY post as theirs.  I assure you--these are my photos and my post and my technique.  I have tried to contact Pinterest about this, but they have not replied.  I am reposting the tutorial in hopes that it will not be removed (I repinned it, but it got removed again so hopefully this new post will work!).  

PLEASE pin away--thanks!!!

How did you paint that?  This is probably the number one question I get--how did you paint that, what is your paint technique?  Honestly, I am not sure I have a technique, but I will attempt to share with you what I do.  However, I do have a disclaimer: I have been painting furniture for more than a dozen years.  My style or technique has evolved and changed and developed over those years, and I am sure it will continue to do so.  I also believe that I might have a knack for it, it comes easily and naturally to me--how I paint a particular thing is often a feeling or instinct.  So, with that said, here you go:
how did you paint that paint tutorial http://bec4-beyondthepicketfence.blogspot.com/2014/04/paint-tutorial-2.html
I am showing this on a piece of pallet wood--all wood and furniture is different and take the paint and stain differently. If at first you don't succeed, keep playing and trying.  I sand the wood usually a little before painting to get some of the rough spots off, but not too much as the roughness helps add to the character.  I most often use what is called a chip brush.  These are inexpensive, natural bristle brushes that cost under $1.  I like them because they do not cover completely, and are cheap enough to replace as needed.
how did you paint that paint tutorial http://bec4-beyondthepicketfence.blogspot.com/2014/04/paint-tutorial-2.html
As I have said many times, I slap some paint on.  I usually paint several boards at once, starting with the lightest color of paint I am using.
how did you paint that paint tutorial http://bec4-beyondthepicketfence.blogspot.com/2014/04/paint-tutorial-2.html

Sunday, April 13, 2014

Junkers Unite With A Reclaimed Wood Shelf


 reclaimed wood shelf, barnwood,pallet wood, http://www.beyondthepicket-fence.com/2014/04/junkers-unite-with-reclaimed-wood-shelf.html
Welcome to a fun, junk filled post at Beyond The Picket Fence with the Junkers Unite Group. We are a group of bloggers who love JUNK, aka "treasures" that would normally be discarded, passed over, ignored.   I am Becky, author and creator at Beyond The Picket Fence.  If it is your first time here, welcome!
*This post contains affiliate links.*

Sunday Verses

God's word bible verse http://bec4-beyondthepicketfence.blogspot.com/2014/04/sunday-verses_13.html

Friday, April 11, 2014

Friday DIY Fun With Friends

Happy Friday! Welcome to our weekly Friday party!  Two post in one day you ask?  I know!  But sweet Karen from Redouxinteriors got together a group of bloggers to share ideas on Fridays and I just had to join the fun.   I love these ladies' blogs, check them out!
Group 1
We are four bloggers, Karen from Redouxinteriors, Katie From Upcycled Treasures, Tami from Curb Alert, and Becky from Beyond the Picket Fence, who all enjoy DIY and repurposing and creating from found junk, aka "treasures".  
PicMonkey Collage

How to Make a Tray from Reclaimed Wood

I know, I know...rustic, reclaimed, salvaged wood are words used around here A LOT.  I love the stuff--give me a new load of reclaimed wood and I am like a kid in a candy store.

reclaimed, salvaged  barn wood
  Where do I get my wood?  I am blessed to have a freind who is a cabinet maker.  He mainly makes rustic, Montana style cabinets.  He gives me his scraps and unusable pieces.  But, I also use a lot of pallet wood.  HERE is a previous post I did that answers some pallet questions such as where to find them, how to take the apart.  

I used some lovely reclaimed oak to make this tray.

A serving tray made from reclaimed barnwood

Wednesday, April 9, 2014

Under $100 Link Party

Oh what a beautiful morning, oh what a beautiful day...the sun is shining, it was 70 degrees yesterday--70!  We haven't seen that since last September.  Snow is predicted for the weekend, but today, I will enjoy the sun!  I hope spring is sprouting where you are, such a season of hopeful expectation.  

Here is some spring inspiration for last week's links:

My Creative Day's spring colored toadstools
DIY Whimsical Toadstools For The Yard mycreativedays.com
Love this pillow from Crystelle Boutique
Picture
Chippy goodness from D.D.'s Cottage and Design

Tuesday, April 8, 2014

Scrap Wood Cross

With Easter upon us, I thought I would come up with (which means create I guess) some crosses.  This one is quick and easy I promise, even though my directions don't sound like it.
reclaimed wood cross http://bec4-beyondthepicketfence.blogspot.com/2014/04/scrap-wood-cross.html
I start with two different widths of wood.  The larger is pallet wood, the smaller some reclaimed oak.  
reclaimed wood cross http://bec4-beyondthepicketfence.blogspot.com/2014/04/scrap-wood-cross.html
I paint the wood and sand it and then from the wider wood I cut three pieces.  The horizontal piece is 16 inches, the bottom vertical piece is 15" and the top is 5".  I then cut the smaller width pieces--the vertical I cut an inch shorter than the length of the vertical piece of the wider cross (could I be any more confusing?).  In other words, the vertical height of the bigger cross is 25" (the 15" bottom piece plus the 5" top piece plus the 5" width of the horizontal piece).

I then use the miter saw to picket the ends of this piece at 45 degree angles.  I don't mark the middle of the board, so they aren't perfect.
reclaimed wood cross http://bec4-beyondthepicketfence.blogspot.com/2014/04/scrap-wood-cross.html

Monday, April 7, 2014

Colorful, Rustic Coat Hook & Shelf

Which came first...the bench or the coat hook?  You thought I was going to say the chicken or the egg, didn't you? That is a discussion for another day.  But, even though I showed you my colorful bench (HERE) first, it really came second, after this coat hook and shelf.
reclaimed wood coat hook http://bec4-beyondthepicketfence.blogspot.com/2014/04/colorful-rustic-coat-hook-shelf.html
I always have lots of colorful scrap ends that need a project.  When I saw a stack of them the same size on my workbench (and by workbench I mean table saw), I decided to use them as a colorful backing for a coat hook shelf.
reclaimed wood coat hook http://bec4-beyondthepicketfence.blogspot.com/2014/04/colorful-rustic-coat-hook-shelf.html

Wednesday, April 2, 2014

Under $100 Link Party

I survived my show last week.  It was a great one, with a fabulous crowd and lots of sales! I am always gung-ho after a show, swear I am going to work really hard early on BEFORE the next show...but, that seems to falter I usually end up pulling a few crazy days. Do me a favor and remind me over the next few weeks to work like a wild woman now, when I don't have a real deadline.

You all have been busy, creating some wonderful, under $100 projects like these:


The colored wood on this fun frame from See Shells Space is right up my alley
Beautiful blue buffet from DD's Cottage

Tuesday, April 1, 2014

Fun, Junky Message Board

I love a good message board.  Maybe it is the allure of keeping all important things together, keeping the family organized and all on the same page.  Maybe it is because they are so fun to make, fun to use junk in unexpected ways.  At any rate, I have made another message center :).
message center repurposed junk http://bec4-beyondthepicketfence.blogspot.com/2014/04/fun-junky-message-board.html
After painting a piece of plywood red, teal, navy, green, and turquoise for the backboard, I used a Chinese checkers board as a magnet board--this one is from the 60's.
message center repurposed junk http://bec4-beyondthepicketfence.blogspot.com/2014/04/fun-junky-message-board.html
complete with checker piece magnets.
message center repurposed junk http://bec4-beyondthepicketfence.blogspot.com/2014/04/fun-junky-message-board.html