Monday, September 30, 2013

Fall Garland

gar·land  ˈgärlənd/  noun  1.) a wreath of flowers and leaves, worn on the head or hung as a decoration. 2. A mark of honor or tribute; an accolade:

I am quite glad that definition includes using a garland as a decoration, because I am not sure how this garland would look wrapped around my head.
Using some silk fall leaves I bought at Michaels,
and some paper circles cut out from an old book (Cutting these by hand is much quicker than using a paper punch.  Depending on the book pages, you can cut up to 15 pages at a time.  I trace the bottom of a plastic cup and cut with scissors.),
and a twelve foot length of garden twine,
I made some fall garlands.  I use a zig-zag stitch to attach the leaves and the paper circles to the twine.
A simple and quick way to add a little fall color to your mantle (or in my case no mantle), a bookshelf, or across a window or mirror.


Sunday, September 29, 2013

Sunday Verses

Beyond The Picket Fence

Thursday, September 26, 2013

Junking Together

I have recently teamed up on Pinterest with some incredible junkers to bring you great pins from blogland. Donna from Funky Junk Interiors is our fearless leader and wow, what a smart and creative woman she is!  It is fun to see what each person brings to the pin board.  Here is a sample of some recent pins and creations from these talented ladies:


Visit their blogs for hours of inspiration!


And find our PIN BOARDS HERE and HERE

Tuesday, September 24, 2013

Chalkboard/Cutting Board Pumpkins

Happy Fall--it is really here.  In typical Montana fashion, we are under a winter storm warning this first week of fall.  That is not stopping me from thinking pumpkins, and leaves turning, apples, and hayrides--oh my!

When I spied Chipping With Charm's little chalkboard pumpkin created with a cutting board, I knew I had to make some too.  
I decided to make mine orange so I added a couple Tbsp. of unsanded grout to a bottle of acrylic craft paint to make chalkboard paint.  I picked up the cutting boards at the thrift store for a dollar or two.

A couple coats of paint and a green painted stem and I have some fun pumpkin chalkboards--perfect for kids or adults.
I love the shape of this guy!
A piece of burlap tied in a knot makes a great eraser.
Easy, and a fun, little fall gift for someone special.

Friday, September 20, 2013

Autumn Blessings

My OLDER sister is one of my biggest supporters.  I think she genuinely loves most of what I make so when she called a couple days ago and requested a fall sign for her front porch how could I say no?

She had bought this sign from me late spring:
She has decided she needs a sign for each season, so I sign she will have :).  I do love her dearly, even if she is my bossy older sister ;-)!
Mom was coming through town so I had to whip this one out in a hurry.  Sis wanted some stripes or chevron and we decided on Autumn Blessings for the saying. This is what I came up with:
 I used a ruler to pencil out the chevron, painted the pumpkin first and then the stripes.
I stenciled the words and free handed a green shadow for the letters.  I know the "shadow" is not scientifically correct, i.e. there is shadow where there shouldn't be any.  Rocket scientist I am not, but quick sign painter I am. 
  I think big sis will enjoy it!
On another note, I purchased a fuzzy orange blanket for fall from TJ Maxx today--the dog approves.

Wednesday, September 18, 2013

Cozy Flannel

Are you ready for cozy flannel yet?

Today it looked like this in the mountains:
and was wet and rainy here in the valley, with the temps in the 40's.

Tomorrow it might be 80 again, but today was a flannel kind of a day. So I made myself a cup of tea and sewed a bit.  

I used some flannel shirts I had been picking up on half price days from the thrift stores.  (This is Montana--we have a plethora of flannel shirts!)  I had been collecting them to make a scarf.


A tip: when using thrift store clothes for fabric, always look in the big and tall and plus size sections--more fabric for your money.  
I cut the arms or body of the shirt into rectangles and sewed them into two identical long strips. I then sewed these, right sides together of course, into a tube, turned it, ironed it, and stitched the end closed.
Simple and cozy!  I am not sticking my tongue out at you, but to my daughter, who was laughing at the faces I was making while modeling the scarf.
I used a few of the extra pieces from the shirts to make a couple pillows.  I buttoned 2 different shirts together and also have a third shirt pattern for the back of each pillow.
I have always learned to cut the fabric the same size as the pillow form so that the pillow is nice and plump, i.e., if your pillow form is 16", cut a 16" square.  It does give these pillows a bit of man who has a beer gut look, 
but I still like them--warm and homey!

Friday, September 13, 2013

Drawer Side Table

Another item I actually managed to photograph before heading into the trailer.  I usually make ottomans from these little lost drawers, but since I already made one of those for the show, this one was calling to be a side table.
repurposed drawer, side table, paint, reclaimed wood, storage, beyond the picket fence, http://bec4-beyondthepicketfence.blogspot.com/2013/09/drawer-side-table.html
I added some 4x4 legs, and my fun and favorite paint combo--red, then bright green, then turquoise.
end table, storage table, salvaged wood, old drawer. paint technique, beyond the picket fence,http://bec4-beyondthepicketfence.blogspot.com/2013/09/drawer-side-table.html
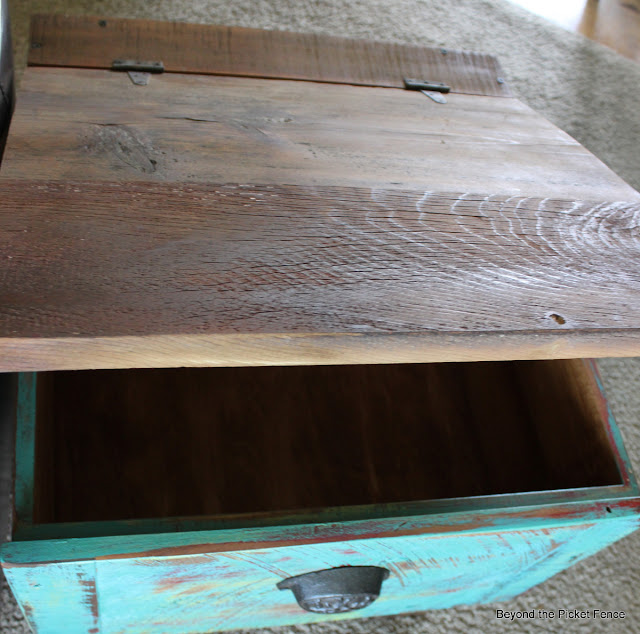
Reclaimed wood for a table top, hinged for hidden storage,
end table, side table, storage, drawer, repurposed, salvaged wood, beyond the picket fence, http://bec4-beyondthepicketfence.blogspot.com/2013/09/drawer-side-table.html
and a handle completed this side table.  
paint technique, old drawer, end table, repurposed, beyond the picket fence,http://bec4-beyondthepicketfence.blogspot.com/2013/09/drawer-side-table.html
I painted a chunky, made in Mexico coffee table in the same turquoise treatment--I am hoping someone buys both pieces together.
end table, drawer, paint, reclaimed wood, barn wood, paint, side table, beyond the picket fence, http://bec4-beyondthepicketfence.blogspot.com/2013/09/drawer-side-table.html

Thursday, September 12, 2013

Rustic, Hobbled Together Entertainment Table/Bar

How is that for a catchy title? 

 I am afraid there are not too many brain cells firing right now.  I am getting ready for a show.  And while I am excited, I also bust it trying to get done EVERYTHING I planned and dreamed I would create.  

It never happens, but I do try.

I decided I didn't have enough big pieces so I hobbled this bar/serving table together 2 days ago.  
I started with an enamel top from a disabled hoosier base.  I painted it with chalk paint because it was badly scratched.
My neighbor said, " I could never imagine this or think up something like this to make."  I told him I had no idea what I was making when I started, that I can't think it up or all the way through before I start--I just put pieces together until I end up with something.

I used a drawer for a base and some nice 4x4 legs (from the aforementioned neighbor).  I decided since this ended a little taller than I planned, there was room for shelf, so I threw that in there.
I added a coat hook and bottle opener


and a level for a towel bar.  

Sorry about the background--I was the only one home and this piece was too heavy to move very far for photos.  I am pretty sure the new neighbors moving in across the street think the lady bringing wine and cheese and crackers to the photograph in the front yard is crazy.

Monday, September 9, 2013

Shabby French Linen Dresser

I bought this dresser several years ago.  She has been hanging out in my basement. storing "stuff", waiting for a new life.
Today was the day she was reborn.  I think I avoided this piece in the past because the glossy, flaking paint scared me.  But with chalk paint, that is no longer a problem.
I did have to use some wood filler on the top back edge and sanded a bit to get the flaking paint off.  I used French Linen from Annie Sloan to paint 'er up.  I put the paint in the fridge for about 30 minutes ahead of time to thicken it up and then painted one coat, painting in a messy manner.
I sanded with a fine sand paper.
I love the wood applique details,

and the chippy paint that came through.

I used spray adhesive to line the drawers with 1912 Saturday Evening Post pages.
Chippy, shabby and sweet--ready for a new home.
Photobucket