Monday, March 20, 2023

Moody Makeover for a Small Half Bath

Do you have areas in your home that might need a makeover but you tend to ignore them because you rarely use or notice them? Such was the case with this small (2.5'x 6'), CARPETED😧, half bath in our mudroom.

Moody Makeover-for a Small Half Bath
When we decided we needed to replace the thirty year old, slow flushing toilet in our main bath we decided to also replace the old toilet in the half bath.
Moody Makeover-for a Small Half Bath
This post contains affiliate links for your convenience at NO EXTRA COST to you. I may receive a small compensation if you choose to buy something from a provided link.

As you can see, the bathroom had the same flat carpet as the mudroom. It was all white with a small, enamel sink, which is the only item we kept. Above the sink was a mirrored medicine cabinet that was not in the wall, but stuck out from it. There was no place to store cleaning items or extra toilet paper. I decided that a new toilet called for a complete makeover of the small half bath.
Moody Makeover-for a Small Half Bath
This small space is really hard to photograph so I will share snippets of the space. I started with painting it black. What, paint a small space black?! You bet!! It doesn't make it any smaller, but definitely makes it warmer and moodier and less institutional bathroom like. 
Peel and Stick Black and White Flooring
After ripping out the carpet, I painted the sub-floor with latex primer and then used this black and white, peel and stick floor tiles that you can GET HERE. It only took two boxes and I am very happy with how it well it is sticking and I love the pattern and the bright white. Be sure to follow the instructions and let the tile acclimate to your home temperature before using it. Hubby installed the new toilet as the flooring was put in around it. the toilet is from Lowes. 
 
Next to the toilet sits a thrift store wastepaper basket that you can see a peek of. It doesn't fit anywhere else in the small bath. On the other side of the toilet there is a plunger and a toilet brush because come one people, let's have those items available to guests without them having to ask for them in case they need it.
Moody Makeover-for a Small Half Bath
I built a shelf to fit under the small, original sink. I built the ladder type structure with the two dowels, one for the shelf to rest on and one for the towel bar. I painted ladder piece black and added Antique Gold Rub-n-Buff (BUY HERE) to the towel bar. A wood shelf sits on the bottom rung and on braces painted black and attached to the wall. I cut a rectangular notch out of the wood shelf to fit around the rather odd and irregular plumbing.  I left the wood a natural color to match the mirror and the other wood tones in the half bath. On the shelf sits a couple extra rolls of TP that are reachable from the throne and a gold wire basket with cleaners in it.
Moody Makeover-for a Small Half Bath
The wire baskets came from the dollar spot at Target. I don't buy much from there, but I knew the small size of these and their gold tone would work perfectly in the half bath. But, only one fits well on the shelf, so I put the other one on the toilet with a tissue box in it.
Moody Makeover-for a Small Half Bath
While we left the original sink (even though there is a small chip in it in the upper right corner), we changed out the faucet. I love the brushed gold faucet I chose from Amazon HERE. Not only does it look great, but the price was fantastic and it came with excellent instructions and a number to call if you needed any backup help when installing.
Moody Makeover-for a Small Half Bath
I can't think of a better way to update a bathroom sink than with fresh hardware.
Moody Makeover-for a Small Half Bath
Instead of the metal, medicine cabinet, above the sink I hung an antique mirror from the thrift store. It looks really dirty in this picture, but that is because I blurred the photo a little. In actuality, the mirror is speckled with some clouding from behind. It doesn't bug me at all as it shows its age well.
Moody Makeover-for a Small Half Bath
The antique arched mirror is made from two matching, vanity side mirrors. I bought them to use them on either side of my bed, but they didn't work there. When they were sitting on the floor next to each other I saw an arched mirror. I wouldn't necessarily want a seam or line down a mirror that I used daily to get ready with, but in a half bath where someone is looking in it as they are washing their hands, it is just fine. The warm wood is so nice against the black wall. You can see the simple light fixture in the mirror that we used to replace the utility light that was in here. It is nothing fancy, but fits the space well and gives off a lot more light. It came as a two pack HERE. The second light replaced the mudroom light outside the bathroom door.
Moody Makeover-for a Small Half Bath
I was willing to repaint the old toilet paper holder, but it was broken so instead I bought this NEW ONE. HINT--a toilet paper holder with an open end should be mounted with the open side AWAY from the toilet so that the roll of toilet paper does not come off when tearing TP off the roll.
Moody Makeover-for a Small Half Bath
On the wall that you see looking in from the door, I hung this wallpaper scrap art that I made from thrift store finds. You can see that post HERE.
Moody Makeover-for a Small Half Bath
Above the toilet I hung this thrift store, bamboo shelf. I didn't really need it for more storage, but it does add a lot of personality and helps to incorporate the color and texture theme in the half bath. The warm, reddish orange color matched the wood on the antique mirror and the wood sink shelf.  I styled the shelf with antique brass items and fun, thrift store finds to add unique personality.
Moody Makeover-for a Small Half Bath
A small brass vase holds faux berries and greenery. Behind that sits a vintage, gold, oval frame. A small, hand-stitched floral, crewel sits behind a vintage, bamboo, oval basket that holds hotel toiletries for guests.
Moody Makeover-for a Small Half Bath
I knew the other side of the shelf needed some height on the top shelf so I styled it with a fake hand from the thrift store that gave an antique brass Rub-n-Buff makeover to. We have a beauty school in town so there are often random hands and heads at the thrift store. On the bottom shelf sits some room spray and lotion and a vintage brass bowl with rice and battery operated tealight candles (to turn on when have guest over).
Moody Makeover-for a Small Half Bath
Katie Saro from The Art of Vintage on The Magnolia Network says every room needs the following: something vintage, an antique, a color scheme, something handcrafted, and something weird just for the sake of being weird. I set out to follow that formula in this tiny half bathroom: VINTAGE-- the brass objects and the bamboo basket, ANTIQUE--the mirror, COLOR SCHEME--black, white, brass, warm wood, HANDCRAFTED--the small embroidery, WEIRD--a gold hand.  

We spent just under $300 on this half bath makeover, with more than half of that cost being the new toilet. It is fresh and quirky and looks so much better than its carpeted, outdated, tired predecessor. It makes me smile when I see it now, rather than just wanting to ignore it by shutting the door. Tackle those spots in your home that bug you, it feels so good.

Wednesday, March 15, 2023

Make a Cute Wood Mushroom from Thrift Store Finds

I have loved mushrooms since I was in elementary school. I loved to draw mushrooms, paint them, embroider them, write stories about mice living under them. The resurgence of the cottage core style and mushrooms has made the child that is still in me quite happy. I decided to make a larger sized mushroom (one so far, more to come) for my porch and outdoor decor.
Make a Cute Wood Mushroom from Thrift Store Finds
I started with a wood bowl I painted several years ago. Wood bowls are a pretty easy find at thrift stores, look for ones that don't have a bottom rim. I set out to find a stem. I could have used a log, and might for others, but I hunted the thrift stores for a wood candle holder or a wood pepper mill or a wood vase--which is what I found.
DIY Mushroom Before
I sanded the bowl and vase both lightly. I made sure to sand the top of the vase and inside the bowl well, where I would be gluing them. After sanding I wiped them down with white vinegar to get any grease off. I painted the base tan and white and the bowl a goldish yellow. 
Make a Cute Wood Mushroom from Thrift Store Finds
I added bits of orange also to the bowl cap.
Make a Cute Wood Mushroom from Thrift Store Finds
I then used Gorilla glue to attach the bowl to the wood vase.  (Yikes, bad picture!)
Make a Cute Wood Mushroom from Thrift Store Finds
I added some white spots to the mushroom.
Make a Cute Wood Mushroom from Thrift Store Finds
I painted them with a stencil brush in an irregular pattern.
Make a Cute Wood Mushroom from Thrift Store Finds
I am working on making a gnome garden for my grandson in my flowerbed by my greenhouse. I have found a red and white mushroom to use out there. Because this is made of wood, I am not sure how it will weather with our weather so for now it is on my covered front porch. 
Make a Cute Wood Mushroom from Thrift Store Finds
I love the yellow with the green I keep on my porch year-round. I added a yellow bucket of drifted and painted sticks under the green table where the mushroom sits. I still have some winter (and fall leaves) on the front porch, but am slowly adding spring touches. I have been sharing that I am using less seasonal decor in my home, but the front porch is one spot where I still plan to change it seasonally. 
Make a Cute Wood Mushroom from Thrift Store Finds
This easy to make, cottage core mushroom is a cheery and sunny addition to the porch.

Monday, March 13, 2023

Brightening Up a Dark Bar with Vintage Finds

I am adding more and more color into my home as the days get longer and warmer. I decided to give my bar that sits in my great room a fresh, bright, and cheery new look too. 
Brightening Up a Dark Bar with Vintage Finds
Here is what the bar looked like at Christmas time.
Brightening Up a Dark Bar with Vintage Finds
I made this bar from a wood beadboard box that was left in our basement. It faces our TV, sits behind our sofa, and is perfect for entertaining. I also sit at it and paint or do projects. I recently hosted book club at my house and hubby played bartender for us. So, it has been a fun and useful addition to our great room. I keep a few things on either end of the bar top as you can see in this picture. The round tray that holds liquor and glassware is metal and because we live near the railroad tracks, everything would rattle on it when a train rolled by. Today, I set out to fix that issue (I hate rattles and repetitive noises) by looking for a wood, round tray at the thrift stores.
Brightening Up a Dark Bar with Vintage Finds
I found this carved wood tray at the second thrift store I looked at. I am not sure if someone didn't finish carving it or if this was the intended pattern, but I thought it had a great vintage, art deco feel to it. I gave the dry wood some much needed moisture with Wise Owl Furniture Salve. You can buy it from my friend, Tina, HERE.
Brightening Up a Dark Bar with Vintage Finds
I added some bright and colorful items to the art deco, wood tray. The red ball-bottom cocktail glasses were a gift from my daughter. She thrifted them and gave them to me for Christmas, along with the Raise Your Spirits cocktail recipe book that she created and all of the flavored simple syrups to make the drinks in the pamphlet.
Brightening Up a Dark Bar with Vintage Finds
I found the matching shot glasses at Goodwill. 
Brightening Up a Dark Bar with Vintage Finds
A white, yellow, and green liquor bottle adds more bright colors, along with the brightly, rainbow colored, vintage cocktail shaker.
Brightening Up a Dark Bar with Vintage Finds
On the other end of the bar sits a thrifted, small, wire wine rack, a vintage shot glass carrier with rainbow striped shot glasses, and a sunny yellow dish of pistachios.
Brightening Up a Dark Bar with Vintage Finds
The vintage, carved, Italian corks or bottle stoppers that I got from a free box at the thrift store sit in the shot glasses. 
Brightening Up a Dark Bar with Vintage Finds
The added color lightens the dark wood bar and the wood tray eliminated the rattle issue that was diving me nuts. Cheers!

Thursday, March 9, 2023

How to Create a Quirky & Welcoming Entryway

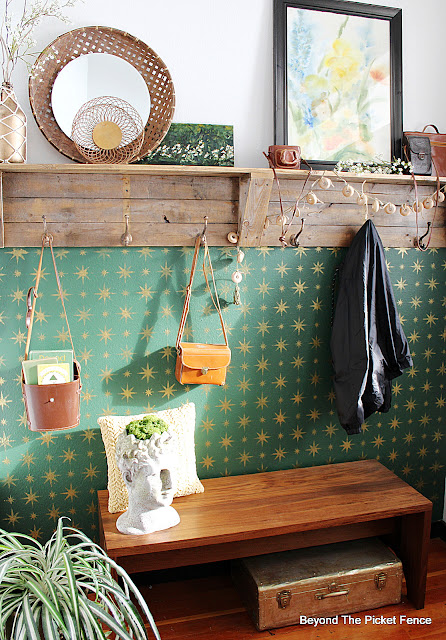
Our front door entryway is one of my favorite spaces in our home. I think because the front doors are the original doors for the schoolhouse and there is glass in the doors that lets in all kinds of lovely sunlight and because I love how I painted and stenciled the wall in the entry awhile back (see that makeover HERE). As I have shared in my last few posts, I am working towards using less seasonal and holiday decor in my home as I move towards a more year-round kind of style. This entryway is a space I have been changing the look for the seasons and while I will completely change it for Christmas, I think I have settled on a look that will work the rest of the year. It is quirky and funky and full of thrift store, vintage items that make me smile. Sometimes I am scared to share my home because it has some weird and I am  worried when I say I love something I have created. But, I do and our living spaces should make us happy and be places that we love and want to spend time in.

How to Create a Quirky & Welcoming Entryway
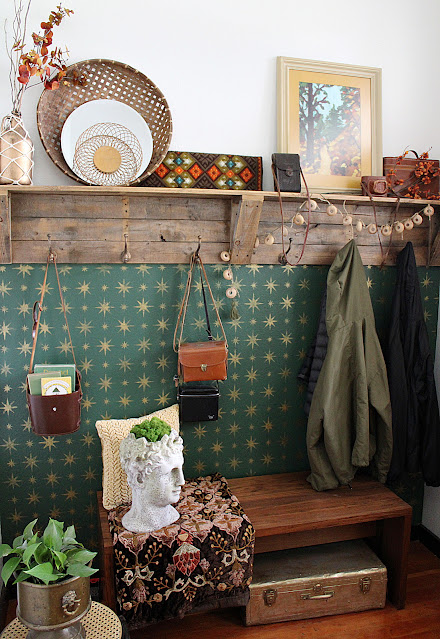
When I painted this wall, I knew I would like the green and that feeling continues. It feels fresh and full of life and really does go with a lot of different colors and styles. The gold retro star that I stenciled is a fantastically fun addition that works well with my quirky vibe. Almost EVERYTHING in this entry is from a thrift store. Keep reading to see what is thrifted and how I used it and how YOU can gather up objects you love to create a cohesive, inviting space.
How to Create a Quirky & Welcoming Entryway
If you haven't read about or seen my entryway space before, I made the shelf that stretches from wall to wall out of pallets. (affiliate link) The complete instructions are in my second book Wood Pallet Wonders that you can purchase HERE. It might be considered rustic, but it has a smooth finish and the wood is warm and adds texture. I have lots of other browns in the entryway to warm it up and to create a cohesive look--brown leather camera and binocular cases, the brown basket tray the mirror is attached to and the basket in front of the mirror, the brown wood bench (still a favorite thrift store find). Repeat colors and shapes and textures to bring together unrelated objects. Our eyes tend to move from object to object that have a similar color or texture. 
How to Create a Quirky & Welcoming Entryway
I especially like this camera lens case from 1910. I put different items in the cases from time to time and I do have some vintage books in one. The Joan Walsh Anglund book is about spring and so I might replace it in a few months.
How to Create a Quirky & Welcoming Entryway
Okay, let's talk about the head in the room.
How to Create a Quirky & Welcoming Entryway
This is my friend Hermes Mercury and he is a thrift store find, thanks to another thrifter. Someone who I see frequently and talk to at Goodwill had this in his cart. He knew that it was cool and these planters are definitely trending. But, my thrifting friend didn't want him so he asked me if I did and I said yes please. Hermes puts the quirk in quirky. My dog barked at him ferociously for the first three days. And, like I said, this is definitely a trendy item, but I do love him. He is strong, handsome, and keeps his mouth shut. 
How to Create a Quirky & Welcoming Entryway
Because this entryway gets COLD in the winter, I can't have any real plants in here yet. We have a door between the entryway and main living area that we shut at night during the winter, but then open during the day. I decided to give Hermes a mossy brain. I put a small wood bowl upside down in the planter space and covered it with moss. It is not glued on at all, just sitting there. A real plant will replace the moss brain in May. Behind Hermes sits a golden yellow, velvet pillow from the thrift store.
How to Create a Quirky & Welcoming Entryway
A faux spider plant sits in a vintage, brass, champagne bucket that sits on a rattan and bamboo stool. All these items are from the thrift store. I will replace the fake spider plant with my monstera when it gets warmer. 
How to Create a Quirky & Welcoming Entryway
I placed the hanging, macrame, gold growler I made HERE up in the corner on the shelf and added some curly willow branches and some faux flower stems from a large thrifted bouquet. 
Friends, if we have to use fake flowers in plants, please, please choose good, high quality fake flowers and plants. I find smaller flower types look more realistic and greenery that has a rubbery texture looks better. Avoid big, fake, silk flowers like roses and tulips. If you can't look at it and wonder if it is real or fake, don't use it.
How to Create a Quirky & Welcoming Entryway
I know chalkboards and chalkboard art is so very 2015. This is the one place that I still have a chalkboard that I use decoratively. I did a simple vase of flowers and this will stay up until fall. It is not perfect or a masterpiece, but I do like it. I made this chalkboard from a chunk of an old, hollow core door that I framed out. The black on the chalkboard is repeated on the black frame on this vintage watercolor painting.
How to Create a Quirky & Welcoming Entryway
The painting is unsigned and it came in a thin gold frame and was matted. It was wrinkly from some minor water damage. Based on the paper and it's aging and yellowing, I would guess this painting is around 40-50 years old. I did cut it down and put it in a frame I had on hand that I painted black. Remember, most spaces need a touch of black for grounding and contrast. I placed a stem of the same fake flowers that are in the gold growler on the shelf. I've actually turned it around since I took these pictures so that the flowers are in front of the brown portable bar case. turning it around helped to add a little more weight on the right side of the shelf and uncluttered the painting. The wood bead garland I made from a thrift store foot massager. It adds visual movement and a casual style with how it is draped.
How to Create a Quirky & Welcoming Entryway
The white flowers and the color black are repeated in this vintage oil painting that I bought for $1 at the thrift store. It has such great texture. Notice how it is tucked behind the basket. Layer objects on shelves and mantels to create depth and to give a space a curated look. 
How to Create a Quirky & Welcoming Entryway
On the left of the chalkboard hangs this mirrored candle sconce. It also hangs on a small angled wall space next tot he door that leads into our great room. I got this at a local thrift store and added the gold to it with Antique Gold Rub-n-Buff (BUY HERE). Some of the mirror or reflecting painting was missing so I used the Rub-n-Buff on it too on the backside. I do light this candle when we are expecting guests in the evening. I also used the Rub-n-Buff on the metal suitcase that went to camp with me as a child that sits under the wood bench. 
How to Create a Quirky & Welcoming Entryway
The hanging gold light in the entryway is one more thrift store find. So there it is, my funky and inviting entryway. What makes it inviting--warm colors, glowing light, vintage accessories that are weathered and that tell a story, a place for guests to sit to remove shoes, coat hooks for bags and coats, a cozy pillow, and plants that speak life into the space. The unusual assortment of objects give the space a playful and casual look that says we don't take ourselves too seriously. Other than replacing the plants with real ones and removing the book about spring, this space is ready to stay as is for at least the next six months. the colors and decor items will work through the seasons. 

Takeaways for you the reader I hope are this: repeat colors and elements and textures, use vintage finds to add personality, vary heights of displays to keep the eye moving, add color (!!!) to create warmth and mood, thrift to find unique and affordable items, only use good fakes when you can't use real plants, and finally, have fun and don't take yourself too seriously.

Tuesday, March 7, 2023

Elements of an Eclectic All-Season Centerpiece

Friends, can we just take a moment to pause and recognize that I have been blogging for 15 years?! This is my 2090th blog post and coming up with titles and ideas for blog posts has not always been easy. 

My mission and purpose in writing a blog has remained the same--to share doable, affordable decorating and design ideas for your home. And, the reason for this intro. is simply because I wasn't sure what to title this post as I have written a lot of titles over the years. In the past I tried to be cuter an catchier with my titles, but then the reader (and I) didn't always know what the post was about. Now I try to be more descriptive without being too terribly wordy. So, with that, let's discuss and learn about creating unique table centerpieces for your home.

Elements of an Eclectic All-Season Centerpiece
I have never had two dining tables--a formal and breakfast table and I haven't always used a table centerpiece. My guess is (although I don't exactly remember) that when my kids were young, my table centerpiece consisted of toys and books and art supplies. But, for the past probably twenty years, I have enjoyed creating a centerpiece or vignette on my kitchen table. They have typically been holiday themed or seasonal. But, if you follow me on socials, you might have seen that I am hoping to move away from doing a lot of holiday and seasonal decorating and rather style my home with more year-round items. I will still change it all out at Christmas, because Christmas, but the rest of the year I hope to only add and delete a few, small, seasonal elements.
Elements of an Eclectic All-Season Centerpiece

A table centerpiece is a nice way to add a finishing touch to your dining space. It reminds you to clean off the table and helps your dining space look clean and finished. You can create such a wide variety of different styled centerpieces with objects from your home, yard, and the thrift store. Keep reading to see five important elements that eclectic, updated centerpieces should incorporate for a cohesive look and how I interpreted those elements or "rules" in this fun, modern, eclectic, all-season centerpiece.

Elements of an Eclectic All-Season Centerpiece
1. Something to ground or set your centerpiece on. You can use a tray, a piece of wood, a large book, or fabric square, placemat, or table runner. I like to use something I can easily remove for large, family style meals where we pass the food at the table (because aren't those the best meals?). If everyone thing is separate, you will have to disassemble the centerpiece. I chose a basket tray with a black edge. Design will tell you that every room and pace needs a touch of black to ground it. The herringbone pattern of the rattan on the tray adds great texture and an organic component. I might add a spring table runner or square tablecloth placed diagonally later, but for now I like the tray on the wood table.
Elements of an Eclectic All-Season Centerpiece
2. Differing heights and textures. To draw the eye and create visual flow and interest, incorporate varying heights and textures in the centerpiece. Not every centerpiece needs height, but if you do want height and want to draw the eye up, use one, taller focal point. In this case I put some funky, faux green plant like stems in a greenish-gold pitcher. I added curly willow branches from my yard for more height and interest. I set the pitcher on a couple old books to add even more height, to ground the pitcher, and to add more of my color scheme. Utilizing different organic details and textures makes a display or vignette more appealing without using a lot of different colors and patterns. This helps it to look more updated and modern rather than a dated display. I used one tall item, one medium item (the candle) and one shorter feature, the alabaster grapes.
And speaking of these grapes. aren't they pretty fabulous? I got these along with a smaller alabaster bunch and a bunch of black stone ones at the thrift store. I placed them in a thrifted,  antique bronze tray filled with green moss from the craft store. I love how the white pops against the green.
Elements of an Eclectic All-Season Centerpiece
3. Odd numbers and different shapes. Even if you like a cleaner, more modern style, odd numbers and asymmetrical and differing shapes make a vignette look put-together and more attractive. Think threes, fives, sevens. You can create symmetry with similarly sized objects rather than using the exact same items. I created three smaller displays on the rattan tray for my centerpiece. I have three different shaped objects on the tray--the oval bowl, the rectangular, brass tray with rounded corners, and the rectangular books. I didn't place these three things on angle in the rattan tray but rather more in a grid  gives the centerpiece a cleaner, more modern effect. More shapes include the candle that is cylindrical the tapered pitcher, and the spherical grapes. Notice, I also used an odd number of objects on the books--the pitcher and two bunnies.
Elements of an Eclectic All-Season Centerpiece
4. Natural elements I believe every display, every vignette, all inside spaces need some natural elements. I am a nature girl and I love the getting outside, but even if you aren't the outdoorsy type, natural objects bring a calmness and fresh breath to our interior spaces. Nature is also a fantastic way to add more texture to a centerpiece. If you live somewhere like I do where it is winter and nothing is grows six months of the year, include good quality, faux greenery and plants. I will always choose fresh and live when I can, but sometimes fake makes better sense. These green stems have that rubbery texture which I find look the most real. I looked at the craft store for faux greenery and after looking at the price I decided to check out the thrift store. For &5 I found a whole, huge bouquet of fake flowers, including these green, funky stems. The green moss, white, creamy stones, and curly willow branches incorporate more nature into the centerpiece. Another way to insert some nature in your home (that I obviously didn't use in the centerpiece) is to use artwork that depicts nature.
Elements of an Eclectic All-Season Centerpiece
5. Repeat colors and textures for a cohesive, updated display.  You don't need to use exactly the same objects for a cleaner, more symmetrical vignette because using the same colors give you the same effect with more interest.  In my centerpiece the green is repeated in the stems and the moss, the creamy white is found in the grapes, the top of the pitcher, one book, the candle, and the rocks, I used brass bunnies and a brass tray and a gold chartreuse book and pitcher, which match the settee behind them. Neutrals are great to repeat, but know that neutrals are so much more than black and white. Any color that you can pair well with two or three other colors can be considered a neutral. Wood is repeated in the oval, wood bowl, the grapes stem, and the curly willow branches.
Elements of an Eclectic All-Season Centerpiece
The thrift store, battery operated candle was the perfect size for this centerpiece. It adds a nice, warm glow and helped to add more white. 
target dollar spot
Okay, I said I was sharing five aspects of creating interesting and updated centerpieces, but I have a SIXTH: Use quirky, unique, vintage finds that you love to make a display that is personal to you. This is also where you can include something seasonal or holiday related. I added these "brass" bunnies from the Target dollar spot. I don't love or often buy from the dollar spot, but for $5 I thought these were cute and I loved the texture on them. I will put something else on the books after Easter. The alabaster grapes sitting on moss are also a bit of an odd thing, but I love them. Mom always had a fruit display on the kitchen table, typically the Lucite grapes, so the grapes remind me of that. 
Elements of an Eclectic All-Season Centerpiece
I am happy with this centerpiece. It will work through the seasons, it is eye-catching and organic, modern and updated. Create a centerpiece of your own. Curate and gather items and remember to think atypical, think un-boring, think fun and funky to create something that is warm and uniquely you and enjoy the process!
Elements of an Eclectic All-Season Centerpiece