

Sunday, July 15, 2012
Saturday, July 14, 2012
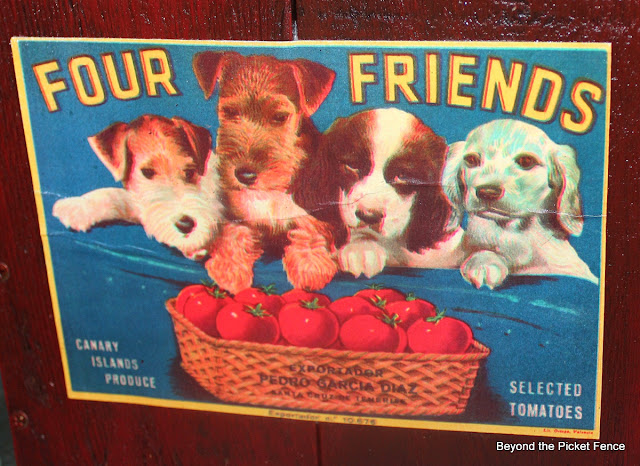
Create a Crate
I love crates and decided to make one out of old fence boards.
 I don't have a tutorial to show, but the construction is fairly simple. I cut the boards--6 the same size for the long sides and the bottom and 4 shorter ones for the ends.
 I realized halfway through construction that I was going to have to find a way to connect them all--running the end boards vertically helped that. I needed to use a smaller piece of wood ( a fence piece cut in half) on the inside of the end pieces to keep it all secure and solid. Sorry, the back of this picture is a little blurry, but you can see the board across the front here too.
 I added some paint and stain,
 and one of my favorite labels from a clipart CD I got several years ago.
 I also added belt piece handles.
 I am usually not too excited about reproduction things--but the old wood on this helped to give it a great vintage quality and it is more solid than most old crates which makes it useable.


 and one of my favorite labels from a clipart CD I got several years ago.

Friday, July 13, 2012
Scrappy Hooks
Using bits and pieces of scrap wood (door jam wood, fence piece, pallet wood, etc.), I made a coat hook.
 I used a thin board screwed to the back to connect the random boards,
 and then added some hooks. I love hooks--they are so much easier and quicker to hang things, even the kids will use them to keep things organized!


Add some hooks to your home today!

Here is another picture from my day trip to Yellowstone earlier in the week. Mother Nature sure creates the best color combinations. A little hot pot trivia--the blue water is the hottest. Microbes that thrive in the different temperatures of water create the amazing colors.

Find more ideas at My Repurposed Life!
and at Funky Junk Interiors
Wednesday, July 11, 2012
Under $100 Linky Party
Summer is flying by for me, you? And I am feeling a little overwhelmed with everything we "need" to do. The fact that I have spent several hours in the car this week driving all over the state I am sure has added to that feeling. Hubby and I talked last night about working smarter not harder. Not sure what that all entails, but I know we need to work on our time management. So I am looking for hints and tips on time management and smarter working/life procedures. I can't wait to hear your ideas in the comments, not as link ups :). Linkups will be the same as always--fabulous ideas that we can recreate that cost less than $100!


Looking at your links each week is like a mini vacation--I truly do enjoy it and appreciate you taking time out of your busy life to share with us!
Beautiful vanity from The Concrete Cottage
Fun sunflower washer necklace from A Creative Princess
A Lived in Home's playroom reveal
Design Dreams by Anne shabbied up an outdated baker's rack
Pretty pleated tote bag from Happy in Red
Pretty French tray from A Lapin Life
Yummy chicken salad from My Life in a Nutshell
Thanks for linking up and for sharing you with us :) !!
Under $100 Linky Guidelines:
1. Please link to the specific post, not your blog!
2. Please only post ideas that cost $100 or less--it would be great if you share the cost of your project, but not necessary.
3. Please include a brief description in link up.
4. Grab my Under $100 button on the sidebar and include it in your post or a link to Beyond the Picket Fence so people can find you and more great ideas.
5. Please check and make sure your link works. If it doesn't you can delete it and try again.
6. Please no direct links to sales sites, i.e. ETSY or just a plain ol' commercial site, we are looking for inexpensive ideas we can recreate.
Tuesday, July 10, 2012
Pallet Storage Bench/Coffee Table Tutorial
Isn't that a catchy title? Ok, not so much. I am a little brain sluggish after spending the day in Jellystone, something I am lucky enough to experience usually at least once a year. It was a crowded, hot day, but still fun and amazing to see, even if it was my 25th plus time. And yes, Old Faithful is still here and still erupting every 90 minutes or so.
 I will say, as is typical for me, I had no plan when making this bench and after making this once, I would do things differently, but here is a tutorial on how I made this one.
 I started with 4 "legs" cut from bunk bed posts I found in an alley garbage.
 I then figured out what sized boards I needed by laying them out. These are all pallet boards and yep, that is bird poop on there--I sanded a little of it off, but painted over it too--texture!
 I then painted the boards.
 Next I cut some 2x4 type boards that are also from pallets. I cut the thinner, painted pallet boards into pieces, at least 2 of the 3 for the sides. I screwed these to the 2x4 pieces, leaving room for the legs on the ends.
 I screwed the legs on which created 2 panel pieces.
 I then added end pieces to make a box.

 Now here is where those 2x4 pieces probably could have been done differently, as well as the bottom, but what I did was added pieces to create the bottom of the box. I screwed the bottom boards into the 2x4's first, which was very secure, but then that made it so I had to find or cut the right width pieces for the rest of it. I screwed those in from the sides.
 Lastly, I added a plywood top. This piece of ply was screwed to one of the pallets I picked up. I hinged it on and waxed it with dark wax.


(Hmm, I need a pedicure.) Even though the construction wasn't perfect, I was happy with the finished product and so was the sweet college girl who bought it.

Monday, July 9, 2012
Beachy Stripes
Inspired by Lake Girl Paints, I gave new life to a little thrift store mission style table. This piece was solid wood, did need a little repair on the bottom rung.
 I painted the piece grey first and then used the dip and drag technique that Deb shows here. It was fast and easy with great results.
 I painted up a trio of candlesticks in 3 bright, beachy colors as well.


Try this technique soon, so much fun!

Sunday, July 8, 2012

Friday, July 6, 2012
Playing by the Numbers?
Inspired by Donna at Funky Junk Interiors, I made a big number 5. It is a little oddly shaped, but I think that gives it a vintage quality.
 The fun part was playing around with paint techniques. I wasn't sure what finished look I was going for so I decided to try a few different things. I melted some wax and added a few blobs of that. I slapped on some red. I sprinkled some salt on it and spray painted brown/rust primer on it. I added some orange and turquoise, sprayed some Murphy's wood soap on the wet paint and added a little more salt. I let all that dry, sanded and added stain.
 Not sure if the finish or technique is anything earth shattering, but I had a blast throwing different things on there and am pleased with the results. The point is--you don't have to play by the rules with paint--experiment and have fun!
 Find more ideas at Funky Junk Interiors.


Wednesday, July 4, 2012
Happy 4th Under $100 Linky Party
Happy Independence Day! Off to firework activities, but in case anyone is around, we will still be having our usual linky party. Here are some fun ones from last week:


From Generation to Generation's fabulous dresser
Twelve O Eight's shabby towel holder
Big boy room from Adventures in Creating
Yummy from Recipes We Love
It is 5 o'clock at Simply Vintageous
Ma Nouvelle Mode's lace refashion.
Thanks for linking up and for sharing you with us :) !!
Under $100 Linky Guidelines:
1. Please link to the specific post, not your blog!
2. Please only post ideas that cost $100 or less--it would be great if you share the cost of your project, but not necessary.
3. Please include a brief description in link up.
4. Grab my Under $100 button on the sidebar and include it in your post or a link to Beyond the Picket Fence so people can find you and more great ideas.
5. Please check and make sure your link works. If it doesn't you can delete it and try again.
6. Please no direct links to sales sites, i.e. ETSY or just a plain ol' commercial site, we are looking for inexpensive ideas we can recreate.
Tuesday, July 3, 2012
EAT
When I saw the EAT letters on Sweet Pickins blog I knew I had to make some. The day after I spied them, hubby came home with a small bundle of old weathered fence pieces, perfect for this project.
 I simply laid the pieces out on the driveway to figure out cuts, etc. I made sure they were the same width and height. The A was the biggest challenge. but not too difficult.
 I laid it out and drew lines where I needed to cut and then took them to the miter saw to find the right angle. BTW, here is my miter saw of choice--it was a Christmas present and we got a screaming deal on it with some trade ins of OLD tools.


I used small pieces of wood on the back to assemble the letters, sorry no pictures of that, these were taken at 6 AM before leaving for the market. I left the wood natural--had to lightly sand it to remove possible splinter hazards (my hands are always a splintery mess) and used a clear wax on the wood.

Subscribe to:
Posts (Atom)